Independant advice for expats in France on telephone, broadband internet, and satellite internet. If you are relocating to or within France, if you live in an internet black spot or you just need help dealing with the French telecoms providers maybe we can help.
To receive email updates of posts to this Blog please enter your email address below.
In conjunction with Europasat we are able to offer some great deals on SES Astra satellite broadband until the end of November 2015.
All new subscriptions made by the end of the month will receive:
A €40 reduction on the hardware costs.
A €10 discount on the activation fees (down from €29.99 to €19.99)
HALF PRICE monthly subscriptions for the first 6 months.
These offers apply to the SES S/M/L packages, the PRO 30 & PRO 50 packages & the unlimited package.
For more information or to take advantage of these great deals please contact me on
info@steve-pritchard.fr
Wednesday, 2 September 2015
Tooway Beam Closures
Eutelsat, the satellite operator who provide Tooway services, have announced that they will not be taking any new domestic subscriptions from customers in France who are covered by 2 of the main Tooway beams which are now running at full capacity.
The beams in question are 15 and 21 which service large parts of Central, East and South West France. In very broad terms if you are located south of Tours then you are unlikely to be able to subscribe to Tooway. If you are to the North of Tours you may still be able to subscribe although there are significant areas - notably south east of Paris - which are still covered by beam 21.
In light of this announcement we are now recommending SES Astra as the solution of choice for customers looking for satellite broadband in France.
If you would like more information on this or more details of the areas covered by beams 15 & 21 then please don't hesitate to contact us.
Professional tariffs are still available in these areas.
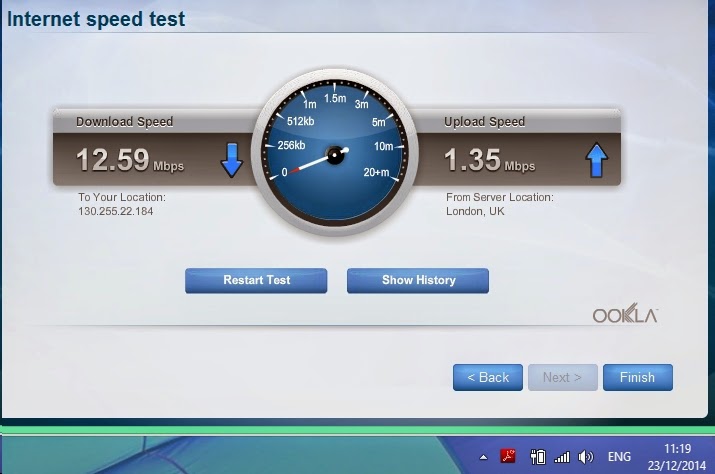
I promised to publish some more information on the speeds we are seeing through our SES Astra satellite broadband system here in the office in the Limousin.
We take tests at random times - the results are not intended as any sort of guarantee of the speeds you will receive but we hope these real life examples are useful in helping you decide whether satellite broadband is right for you.
Firstly here is the result of the latest test conducted today the 11/02/2015 at 16.48 French time:
Test from 03/02/2015 at 18.34 French time. Late afternoon is the time we are typically seeing slowest speeds, dropping to around 7 or 8 Mbps:
Our new web site is now available online with more details of the services we provide and the satellite broadband deals available across France.
We have built the site to be fully responsive - that is to say the layout will change depending on the size of screen it is being viewed on. As of January 2015 all websites we develop for clients will have a responsive design as standard - no extra cost. Please contact us if you would like more information about our website design, hosting, SEO & online marketing services.
If you have read my previous post you will know that before Christmas we installed an SES satellite broadband system to service our office in the Limousin.
One of the reasons for doing this was to measure the speeds actually being achieved so that we can share this information with potential clients. It is after all the question we get asked most!
The first thing I did after activating the system was perform a speed check. At 3 pm on a Saturday I was pleasantly surprised to be hitting the 20Mbps download speeds advertised:
Speeds achieved on the 6th December at 15.05
I then downloaded a printer driver from the HP website that I had been meaning to do for ages. The 143 mb file downloaded in 1 minute 12 seconds - a job that would have taken around half an hour on my landline connection.
I have been monitoring the connection speeds on an ad-hoc basis and will publish a journal in a separate post. In general, however, the system has exceeded my expectations.
In the daytime when I do most of my work connection speeds are fairly consistently in the 16 Mbps to 20 Mbps range.
The slowest time is late afternoon and evening when the network is at its busiest. Speeds at this time can drop to between 3 Mbps and 6 Mbps.
Speeds achieved at peak time - 22nd December at 18.08
Speeds achieved at peak time - 28th December at 16.56
Even at peak times the SES system far outperforms the landline connection we have in the Limousin both in terms of speed & reliability.
I now use the satellite as my default connection & have added the Freezone option which allows unlimited overnight usage. I use this mostly to download upgrades for the various devices we have here, which can be large files. Using Freezone means that none of this eats in to the monthly allowance.
One of the decisions that need to be made when opting for a satellite broadband system is "Do I install it myself or get a professional in?"
In December we installed a new SES satellite broadband system to service our office in the Limousin. DIY has never been one of my strengths - quite the opposite in fact. My partner's father, however, is a very proficient DIYer & I was able to take advantage of him staying for the Christmas holidays to have a go at installing the system ourselves.
This is a short account of how we got on - the hard bits, the easy bits & what to look out for along the way. You may find it helpful in deciding whether or not this is something you'd be happy taking on.
STEP 1 - Decide where to position the dish and fix a suitable mounting bracket.
You will already have decided where on your property the dish will be positioned so that the dish has a clear line of site to the satellite before ordering your system. Of course we will provide all the help you need to do this - the Dish Pointer Pro site is a great place to start.
Fixing the mounting bracket is one of the hardest parts of the installation, but if you are confident with a power drill & you don't need to work at too great a height then it shouldn't pose too much of a problem. You can order a 'standard' wall mounting bracket along with the rest of your kit so that it is all delivered together.
We fixed our mounting bracket on a stone wall about 4 meters off the ground. Fixing the bracket as low as possible is a good idea as it is then much easier to access to mount and align the dish. Think about how high your dish will be, whether you have sufficiently long ladders and whether you'll be confident working at that height when deciding whether or not to self install.
We drilled 6 holes using an electric drill with hammer action and good masonry drill bits. With six heavy duty sleeve anchors the mounting was solid!
STEP 2 - Read the manual and assemble the dish accordingly.
This is fairly straightforward - the documentation provided is clear & easy to understand. There is also a DVD supplied along with the kit which can be useful!
It is basically a question of fixing the mounting bracket and arm to the dish using the bolts provided.
STEP 3 - Mount the dish on the wall bracket.
Again, pretty straightforward. The instructions suggest fixing the 'Tria' (the device fixed to the end of the arm protruding from the dish which handles all the communication to and from the satellite) after the dish is mounted on the wall bracket. We found it much easier to fix the tria to the end of the arm and to attach the 2 cables before mounting the dish. This avoided having to lean out from the wall to reach the end of the arm in order to complete the fiddly tasks of fixing the tria in place and tightening the cable cable connectors.
The assembled dish is pretty heavy - this is definitely a 2 person job so make sure you have a friend available to help!
STEP 4 - Run the cable into the house.
This is probably the second trickiest part of the process. The system is provided with 30 meters of dual coaxial cable which should be more than sufficient. The cable needs to run from the dish, into the house to where the modem will be situated.
Think about the positioning of the modem and the route the cable will take before you start. Will you need to drill through stone walls to bring the cable in & if so do you have a long enough drill bit & a drill which is up to the job? It may be possible - and preferable - to bring the cable in under a roof tile & through the ceiling.
In our case we were able to run the cable along the wall and in through the bottom of a wooden window frame, which made the drilling a lot easier.
We quickly realised that trying to handle 30 meters of coiled, dual core coaxial cable is very difficult. Try to work out the length you will actually need, give yourself a generous contingency and then cut the cable to that length. Shorter lengths are much, much easier to uncoil & handle!
STEP 5 - Connect the modem
Nothing too tricky here - fix the connectors supplied to the coaxial cables you've brought into the house and connect them to the modem.
Connect your PC or laptop to the modem using the cable provided and open your web browser to access the modem configuration screen.
STEP 6 - Point the dish to connect to the satellite.
Once you have connected your modem and accessed the configuration screen the next step is to point your dish so that it is properly aligned and can lock onto the satellite. As long as you can reach your dish fairly easily then this step just requires patience!
The dish will start to emit a series of audible beeps which change as you adjust the alignment. Initially you will 'coarsely' align the dish horizontally & vertically using the coordinates provided for your location. When the noise coming from the dish plays a short musical tune you know that the dish has seen the satellite so you are broadly pointing in the right direction.
From that point it is a question of fine tuning the alignment - repeatedly making small movements horizontally & vertically with the aim of making the noise from the dish as steady & as high pitch as possible.
It is useful to have somebody keeping an eye on the screen of your computer which will show the strength of the signal being received. As you make slight adjustments the signal strength will go up and down - my job was to shout out the window so the person making the adjustments knew if what he was doing was making things better or worse and could eventually arrive at an optimum position.
To use the satellite service a signal strength of over 5dB is required. It should be possible to achieve something around the 8db mark, however. The installation guide shows a signal of 10db in the pictures used - you won't manage a signal that strong but it is no problem.
Once you have aligned the dish to its optimum position simply tighten up all of the nuts so that the dish cannot move and allow the modem to complete the configuration & activation - all of which it does automatically. That's it! You are now on-line.
So how long does it all take?
We started the installation at about 11.00 in the morning, working at a steady pace with plenty of stops for cups of tea and for lunch. By 4.00 pm we had completed the modem installation (step 5) and were ready to start pointing the dish. Because of fading light and an unfortunate ladder incident suffered by yours truly we decided to leave the pointing to the following day.
The pointing process took around about an hour to complete.
In summary:
To summarise, I would suggest that when you are deciding whether or not to self install, the following considerations are key:
How high will the dish need to be mounted? Do you have the ladders needed and will you be comfortable working at that height?
Think about how you will get the cable into the house. Do you have the necessary tools & confidence to drill any holes needed?
Do you have somebody who will be willing to help? It is really a 2 person job.
We can provide you with the installation guide to help you decide if self installation is something you are confident to take on. The video below also shows the whole process very clearly (you will receive this video on a DVD along with the kit):
If, on balance, you decide that using a professional installer would be better then we have built up a network of contacts across France over the last 12 years and can almost certainly put you in touch with somebody to help.